
How much time do you spend each week on repetitive tasks? Updating records, sending notification emails, reminding team members about deadlines, or copying data between systems? If you’re like most digital professionals, the answer is likely “too much.”
In our previous articles in the Airtable Mastery series, we explored how to move beyond spreadsheets, migrate your data, and visualize information in Airtable. Now it’s time to unlock one of Airtable’s most powerful features: Automations. This is where Airtable truly becomes spreadsheets on steroids.
In this guide, you’ll learn how to set up Airtable Automations to handle repetitive tasks without writing a single line of code. We’ll cover everything from understanding automation fundamentals to building practical automations that will save you hours each week.
Understanding Airtable Automations
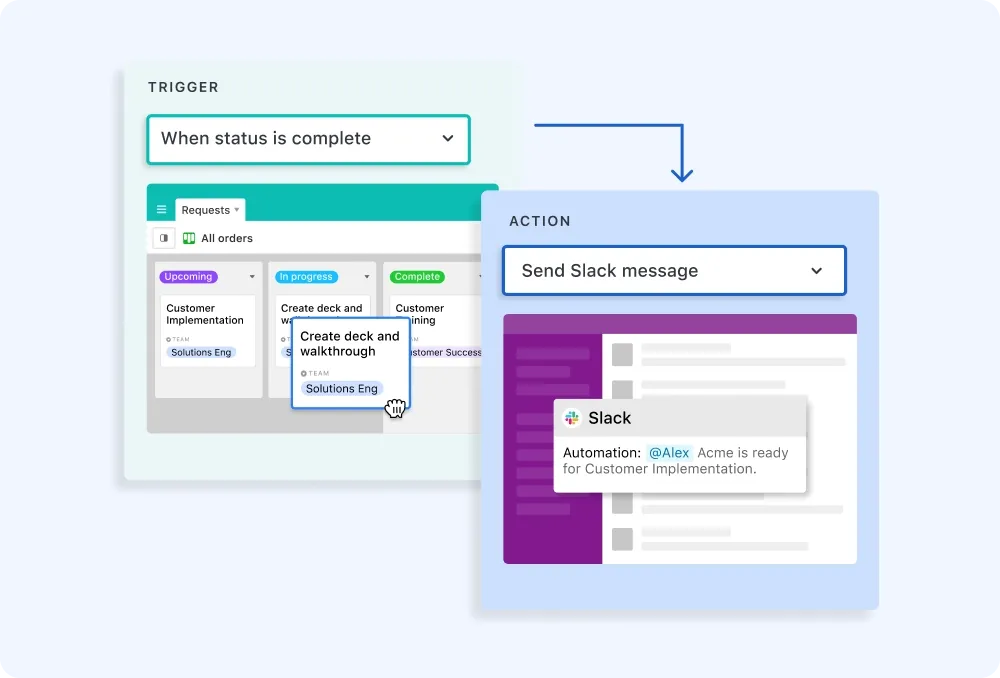
Airtable Automations are built around a simple principle: when this happens, do that. In automation terminology, these are called triggers and actions.

What Are Triggers?
Triggers are events that start an automation. Airtable offers several types:
- Record triggers: Run when records are created, modified, or meet specific conditions
- Scheduled triggers: Run at specified times or intervals
- Form submission triggers: Run when someone submits a form
- User action triggers: Run when users interact with a button
What Are Actions?
Actions are the tasks that automation performs after being triggered. These include:
- Sending emails
- Creating, updating, or deleting records
- Posting to Slack
- Running scripts (for advanced users)
- Connecting to external services
The beauty of Airtable Automations is that they’re entirely visual—no coding required. You simply select options from menus and configure them through a user-friendly interface.
Pro Tip: The number of automation runs available depends on your Airtable plan. Free plans include a limited number of runs per month, while paid plans offer more generous allowances.
Creating Your First Automation: A Step-by-Step Guide
Let’s create a simple but useful automation: sending an email notification when a task’s status changes to “Complete.”
Step 1: Access the Automations Menu
- Open your Airtable base
- Click the “Automations” button in the top right corner
- Click “Create a new automation”
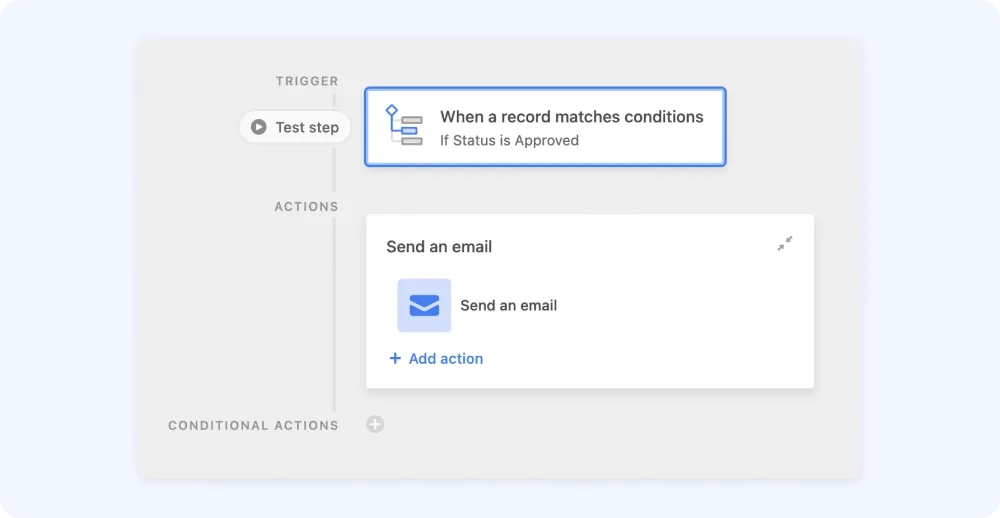
Step 2: Set Up Your Trigger
- In the “Choose a trigger” section, select “When record matches conditions”
- Choose your table (e.g., “Tasks”)
- Set your condition: “Status” is “Complete”
- Save the trigger
Step 3: Add an Action
- Click “Add action”
- Select “Send email”
- Enter the recipient email address (you can use a dynamic value from your record)
- Create a subject line like “Task Completed: {Task Name}”
- Write your email content, incorporating fields from your record
- Save the action
Step 4: Test and Enable
- Test your automation using the “Test” button
- If everything looks good, toggle the automation to “On”
Congratulations! You’ve just created your first Airtable automation. Whenever a task’s status changes to “Complete,” the system will automatically send an email notification.
Email Automations for Business Communication
Email remains the backbone of business communication, and Airtable’s email automations offer tremendous flexibility.
Notification Emails
Beyond the basic example above, you can create sophisticated notification systems:
- Alert team leads when tasks are overdue
- Notify customers when orders change status
- Send reminders when deadlines approach
Email Digests
Rather than sending individual emails for every event, you can create digest emails:
- Use a scheduled trigger (e.g., “Every Monday at 9 AM”)
- Configure the email action to include a summary of records
- Format the email to show key information at a glance
Personalization and Formatting
Make your automated emails look professional:
- Use dynamic fields to personalize content (“Hi {First Name},”)
- Apply basic HTML formatting for structured emails
- Include links back to relevant Airtable records
Pro Tip: Test email automations by sending them to yourself first. This helps catch any formatting issues or missing information before your team or clients see them.
Beyond Email: Other Powerful Automation Use Cases
Email is just the beginning. Here are other valuable automation scenarios:
Slack Notifications
Keep your team informed without leaving their chat platform:
- Connect Airtable to your Slack workspace
- Create an automation with a record-based trigger
- Choose the “Post to Slack” action
- Select the appropriate channel and customize the message
Automatic Reminders
Never forget a follow-up again:
- Set a trigger based on a date field (e.g., “When ‘Due Date’ is 2 days from now”)
- Configure an action to update a “Reminder Sent” field to “Yes”
- Add an email action to send a reminder to the responsible person
Status Changes Based on Criteria
Automate record updates when certain conditions are met:
- Create a “When record matches conditions” trigger
- Add an “Update record” action to change status or other fields
- Include additional notifications as needed
Data Enrichment
Automatically populate fields based on other information:
- Trigger when a new record is created or a specific field is filled
- Update related fields with calculated values or information from lookup fields
- This keeps your database consistently updated with minimal manual input
Testing and Troubleshooting Best Practices
Even the most carefully built automations sometimes need fine-tuning. Here’s how to ensure yours run smoothly:
Effective Testing
- Use the “Test” function before enabling automations
- Start with simple automations and build complexity gradually
- Consider creating a test record specifically for verifying automations
Common Issues and Solutions
- Automation not triggering: Check that your trigger conditions aren’t too restrictive
- Missing data in emails: Ensure you’ve properly referenced dynamic fields
- Too many notifications: Consider using conditions to make triggers more specific
- Reaching automation limits: Review automation runs in your usage stats and optimize where possible
Monitoring Your Automations
Airtable provides tools to track your automation performance:
- Visit the Automations panel
- View the history of each automation
- Check for errors or skipped runs
- Adjust configurations as needed
Putting It All Together: Building an Automation System
The real power of Airtable Automations comes when you create an interconnected system that handles different parts of your workflow. For example, a client management system might include automations that:
- Send welcome emails when new clients are added
- Notify team members when projects approach deadlines
- Update project status based on completion of related tasks
- Generate weekly progress reports for stakeholders
- Archive completed projects after a set period
By combining these automations, you create a semi-autonomous system that maintains itself with minimal manual intervention—bringing you closer to achieving true Operational Flow in your business.
Conclusion: From Manual Work to Automated Workflow
Airtable Automations transform your database from a passive repository into an active system that works for you. By identifying repetitive tasks and converting them into automated processes, you free up valuable time to focus on strategic work that truly requires human intelligence and creativity.
Start small, with a single automation that addresses a pain point in your current workflow. Once you see the impact, you’ll likely find yourself discovering more opportunities to automate—each one bringing you closer to a more efficient, error-free operation.
Automation is a game-changer! If you’re not yet using Airtable, sign up today via our link to follow along! But what about working with your team? Next, we’ll explore how Airtable becomes a collaborative hub.
This post is part of the StructLabs.io Airtable Mastery series, designed to help digital professionals graduate from spreadsheets to powerful database solutions.
Affiliate Disclaimer: This article contains affiliate links. If you sign up for Airtable through our link, StructLabs.io may earn a commission at no extra cost to you.
AI Disclosure: This article was drafted with the assistance of an AI model.
Images taken from Airtable website.